This is my 1977 Buick Skylark forum webpage to help others in their Odd Fire rebuild.
THANK YOU TO IRA, ALICIA, MY MOM, NOAH AND ANYONE ELSE WHO HELPED TROUBLESHOT WHEN THEY HAD TIME.
NOTE: IF YOU GET A GASKET SET THEY WILL GIVE YOU FEL-PRO PERMATORQUE HEAD GASKETS THAT ARE MUCH THICKER HEAD GASKETS THAN THE ORIGINAL THIN GASKETS. I HAD TO BUY LONGER PUSHRODS 8.85 TO BE EXACT FROM JEG'S BECAUSE THE THICKER GASKETS RAISED THE HEADS AND THE ROCKERS, THESE ENGINES DON'T HAVE ADJUSTABLE ROCKER ARMS. YOU CAN TRY TO FIND THE ORIGINAL THIN GASKETS BUT I HAD NO LUCK.
HOPE THIS WEB PAGE HELPS, THERE'S NOT ALLOT OF INFO ON THESE ENGINES AND I DID ALLOT OF EXTENSIVE RESEARCH AND PIECING TOGETHER TO GET JUST THIS MUCH FOR MY REBUILD, HOPE IT HELPS.
!!!WEAR SAFETY GLASSES, BACK BRACE IF YOU NEED, FACE MASK FROM FUMES, TAKE ALL PRECAUTIONS AND SAFETY MEASURES BEFORE PREFORMING ANYTHING!!!
231 V6 3.8L Odd Fire Rebuild
A guide to a BUDGET rebuild the 231 V6 3.8L Odd Fire
Whether you are an intermediate mechanic or beginner you can do this, I had never rebuilt an engine in my entire life short from changing oil and breaks and I successfully rebuilt this engine from top to bottom working (with used parts!) running and all. You do have to be very patient and pay attention to detail and be very thorough, recheck everything 10 times. DETAILS DETAILS DETAILS. Take pics and notes on everything, use your phone camera to document everything or sketch drawings and save back ups. I DID NOT USE A CAM-WHEEL TO RE-TIME OR ANYTHING.
Believe it or not I rebuilt this engine using used parts from another 1976 231 odd fire engine that I got from my local wrecking yard. These particular engines were made from 1975-1977 and the parts can be interchangeable. If a mechanic was doing this with me they would have said "NO WAY DON'T DO THAT" almost every step. The used engine I got was a gamble and it was filled with water and rust in the oil pan and crank... but I am not one to stop at hurdles, I cleaned up everything nice, reused the good bearings and crankshaft and swapped out a couple of pistons too and the motor runs PERFECT!!!
Take pictures Before You Remove the Engine
Take pictures of the engine, all the connections, bracket positions, vacuum lines etc everything before you disconnect anything and remove the engine, get every angle, wire, lead, linkage and anything you will be unbolting or disconnecting if this is your first time. Take pics of the pulley belts and which pulley they are assigned to. Take pics of your vacuum lines and where they lead. DOCUMENT DOCUMENT DOCUMENT!!! Do not skip steps or get lazy...you will kick yourself.
Mark all wires or vacuum lines with a piece of tape and write matching numbers. Example if you remove the canister hose mark the hose with a number of your choosing like #4 written on the tape at the end of the hose then where you disconnected it mark a #4 as well so you know where it goes if you don't know the names of the leads etc. this is an easy way of remembering where things go after disconnecting them.
Mark all wires or vacuum lines with a piece of tape and write matching numbers. Example if you remove the canister hose mark the hose with a number of your choosing like #4 written on the tape at the end of the hose then where you disconnected it mark a #4 as well so you know where it goes if you don't know the names of the leads etc. this is an easy way of remembering where things go after disconnecting them.
REMOVING THE ENGINE
!!!!!!!This is just a guide, if this is your first time removing an engine do some more research online to better prepare yourself on how to properly remove an engine. DO NOT JUST USE THIS GUIDE!!!!!!!
Have 1-3 people at least near you helping you when your ready to pull the engine out after everything is disconnected.
YOU MUST use jack stands, a jack lift as a 2nd fail safe under the frame of the car NOT lifting the car higher than the jack stands just ever so slightly set up against the bottom side of the frame, let the jack stands take the weight, the jack lift is used just as a backup. Put blocks behind your rear wheels placed snug behind them to keep the car from rolling backwards and put on your e-break, I even went as far as putting blocks of wood under my front tires when I raised the car as a 4th fail safe while you work on removing the parts under the car required to remove the engine, MAKE SURE YOU LOWER THE CAR BACK DOWN WHEN YOU ARE READY TO REMOVE THE ENGINE ITSELF.
Removing an engine requires you to:
At this point everything should be clear to remove the engine. If you are using a cherry picker have 1 to 2 friends or even more people to help you gently wiggle and lift the engine out making sure there is nothing connected while having your friends help guide it out with out the engine flying and slamming into your AC condenser. Make sure you use a proper cherry picker that can handle the weight of your engine and use proper straps or chains that are rated to hold in well over excess the weight of your engine. You must use higher rated chains and equipment because any movement of the engine creates 2 times or more the weight of the engine in inertia. So if your engine weighs 700lbs you need to use 1400lbs or higher rated chains or straps and set your cherry picker to at least 3/4 ton which is 1500lbs or more ALWAYS ROUND UP YOUR NUMBERS. Just think 2-3 times the amount of weight of the engine. 1 ton is 2000 lbs, 3/4 ton is 1500 lbs, 1/2 ton is 1000 lbs, 1/4 ton is 500lbs and so on.
Have 1-3 people at least near you helping you when your ready to pull the engine out after everything is disconnected.
YOU MUST use jack stands, a jack lift as a 2nd fail safe under the frame of the car NOT lifting the car higher than the jack stands just ever so slightly set up against the bottom side of the frame, let the jack stands take the weight, the jack lift is used just as a backup. Put blocks behind your rear wheels placed snug behind them to keep the car from rolling backwards and put on your e-break, I even went as far as putting blocks of wood under my front tires when I raised the car as a 4th fail safe while you work on removing the parts under the car required to remove the engine, MAKE SURE YOU LOWER THE CAR BACK DOWN WHEN YOU ARE READY TO REMOVE THE ENGINE ITSELF.
Removing an engine requires you to:
- Remove the bellhousing cover under the car
- Remove the bolts from the flywheel that connect the torque converter and the flywheel/flexplate
- Remove the bellhousing bolts that attach the engine to the transmission located near the firewall under the hood and under the car
- Remove the exhaust cup-links to detach the exhaust from the exhaust manifolds
- Remove the fuel line hose located below the power steering pump making sure to catch excess gas with a bucket under the fuel line
- Remove power steering pump from the brackets only DO NOT detach the hoses from the power steeing pump or car, just set the power steering pump aside on a place it will sit while it is still attached to the hoses
- Remove the AC unit from the brackets only DO NOT detach the hoses from the AC or the car, just set it aside on a place it will sit while it is still attached to the hoses
- DISCONNECT THE RED POSITIVE TERMINAL from the battery then detach starter wires that are on the starter itself
- Making sure the red positive battery terminal is unplugged then remove alternator lead wire on the back of the alternator.
- Unplug any remaining electrical wires that will stop you from taking the engine out, if you are not sure remove all that you think will prohibit you from removing the engine. REMEMBER WHERE THE WIRES RECONNECT. TAKE PICTURES or MARK WITH TAPE AND MATCHING NUMBERS!
- Remove the fan guard if present and remove the fan clutch on the front of the motor.
- Remove the large bottom coolant hose from radiator catching all coolant in a bucket, remove the large top coolant hose too, detach the metal transmission lines from the radiator and any other links connected.
- Remove the radiator from the car first unbolting the top metal cover plate holding down the radiator if present.
- Disconnect all vacuum lines, take pictures or mark them with tape and corresponding numbers.
- Unbolt the engine mount bolts that are on the chassis and remove the bolts
- REMOVE YOUR HOOD WHEN YOU ARE READY TO TAKE THE ENGINE OUT.
- IT HELPS TO REMOVE THE FRONT BUMPER, THIS ALLOWS THE CHERRY PICKER TO GET CLOSER TO THE ENGINE CENTER.
At this point everything should be clear to remove the engine. If you are using a cherry picker have 1 to 2 friends or even more people to help you gently wiggle and lift the engine out making sure there is nothing connected while having your friends help guide it out with out the engine flying and slamming into your AC condenser. Make sure you use a proper cherry picker that can handle the weight of your engine and use proper straps or chains that are rated to hold in well over excess the weight of your engine. You must use higher rated chains and equipment because any movement of the engine creates 2 times or more the weight of the engine in inertia. So if your engine weighs 700lbs you need to use 1400lbs or higher rated chains or straps and set your cherry picker to at least 3/4 ton which is 1500lbs or more ALWAYS ROUND UP YOUR NUMBERS. Just think 2-3 times the amount of weight of the engine. 1 ton is 2000 lbs, 3/4 ton is 1500 lbs, 1/2 ton is 1000 lbs, 1/4 ton is 500lbs and so on.
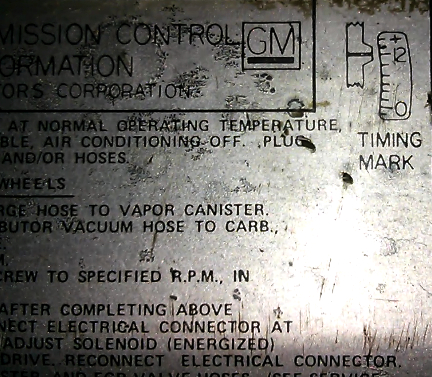
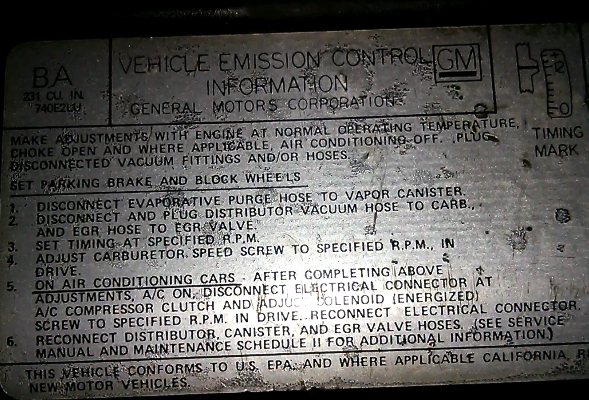
Vacuum Line Diagram
This is the closest vacuum diagram I could find for the 1977 Buick Skylark. It has the air pump and original 2bbl Rochester illustration. I don't remember what website I got this from or the exact year this was representing but it was the closest that matched the equipment and that matched my original vacuum lines.
Time for Dismantling

Before you get this far REMOVE the vacuum lines marking them or taking pics and then remove all the large external parts first, like the exhaust manifolds, carburetor, alternator, smog pump and anything attached to the brackets.
(Take all bolts and nuts and thread them back into the original spot you took them out of... this is extremely helpful in not losing and mixing up bolts)
Then remove the brackets REMEMBER TAKE PICS before removing the brackets, they can be puzzling.
Now you can remove the valve covers, rocker arms, intake manifold, pushrods and the heads and all the pushrods and lifters (Wait to remove the water pump). By removing the heads before the water pump you expose the coolant channels, buy a cheap siphon w/ hand pump that will fit in the coolant holes, siphon out the coolant into a bucket or if you have an engine stand you can simply tip the engine to its side and drain the coolant in an appropriate container, now when the fluids are low enough you can take off the water pump without the coolant spilling all over you and all over the lower pulleys. (NOTE: KEEP PUSHRODS AND ALL ITEMS IN THE SAME ORDER THEY WERE REMOVED)
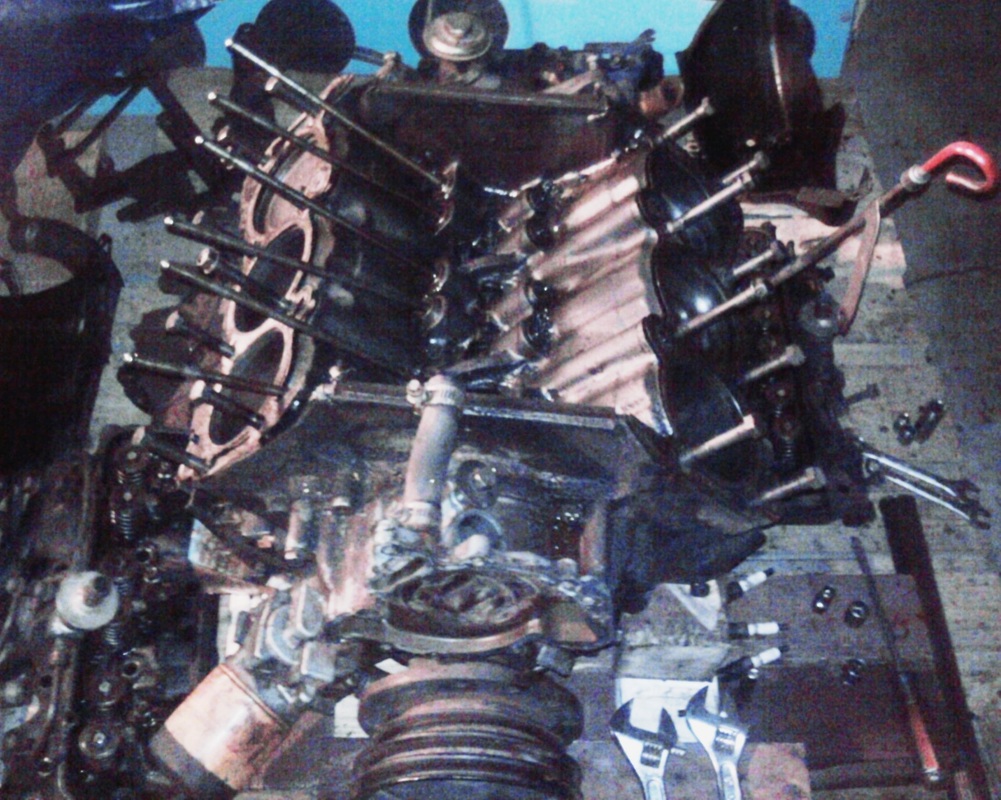
Place All Items Back in Original Order.
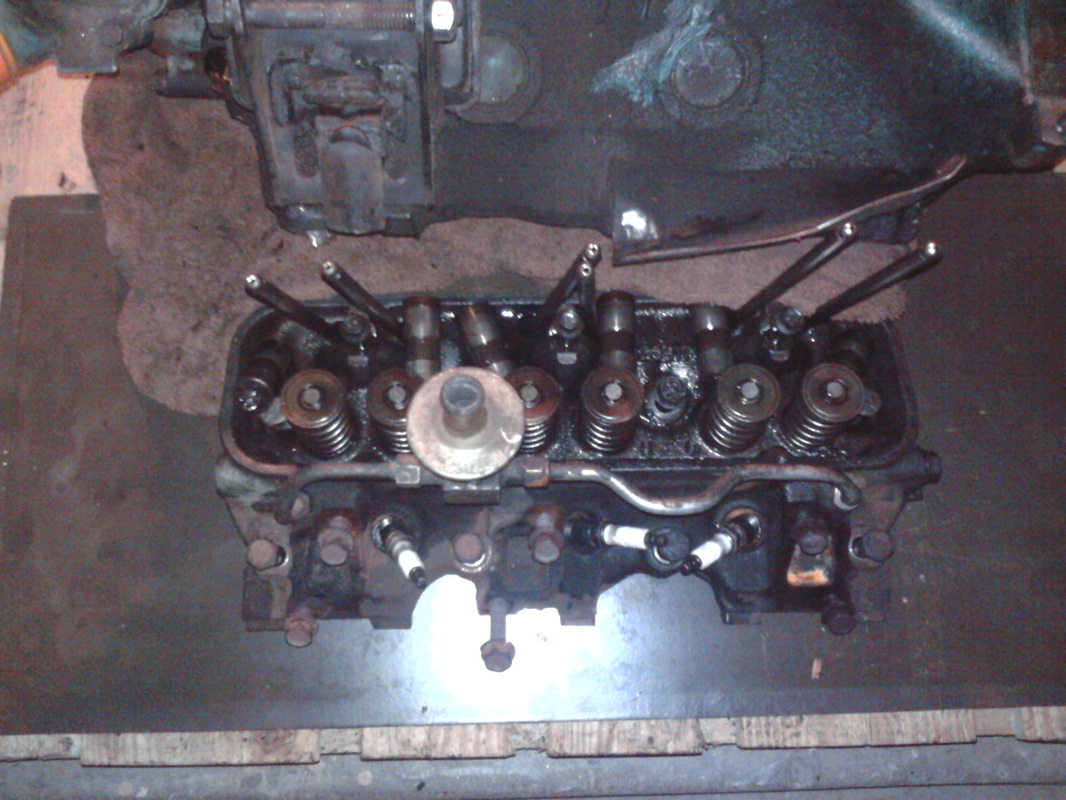
(NOTE: KEEP PUSHRODS AND ALL ITEMS IN THE SAME ORDER THEY WERE REMOVED, NOTICE IN THE PIC. WHEN YOU REMOVE THE HEADS YOU CAN PLACE THE PUSHRODS BACK IN THE HEAD HOLES THEY CAME OUT OF IN THE SAME ORDER ALONG WITH THE LIFTERS) YOU DON'T NEED TO BUY OR CREATE AN ORGANIZER, THIS DOES THE SAME THING AND ITS FREE!
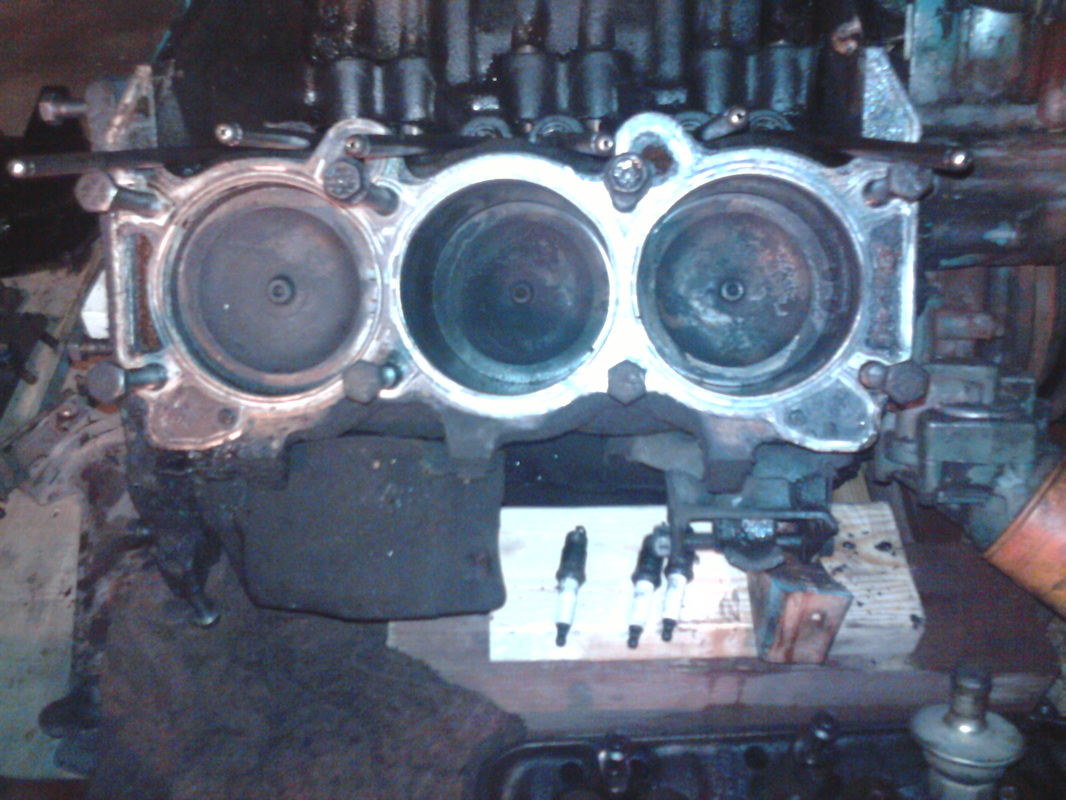
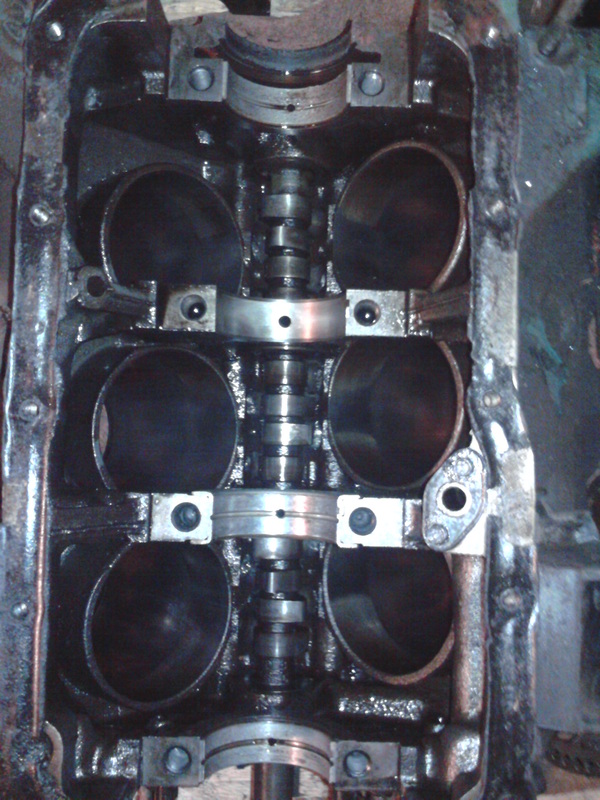
A LOOK AT THE PISTONS
THE "VALLEY"
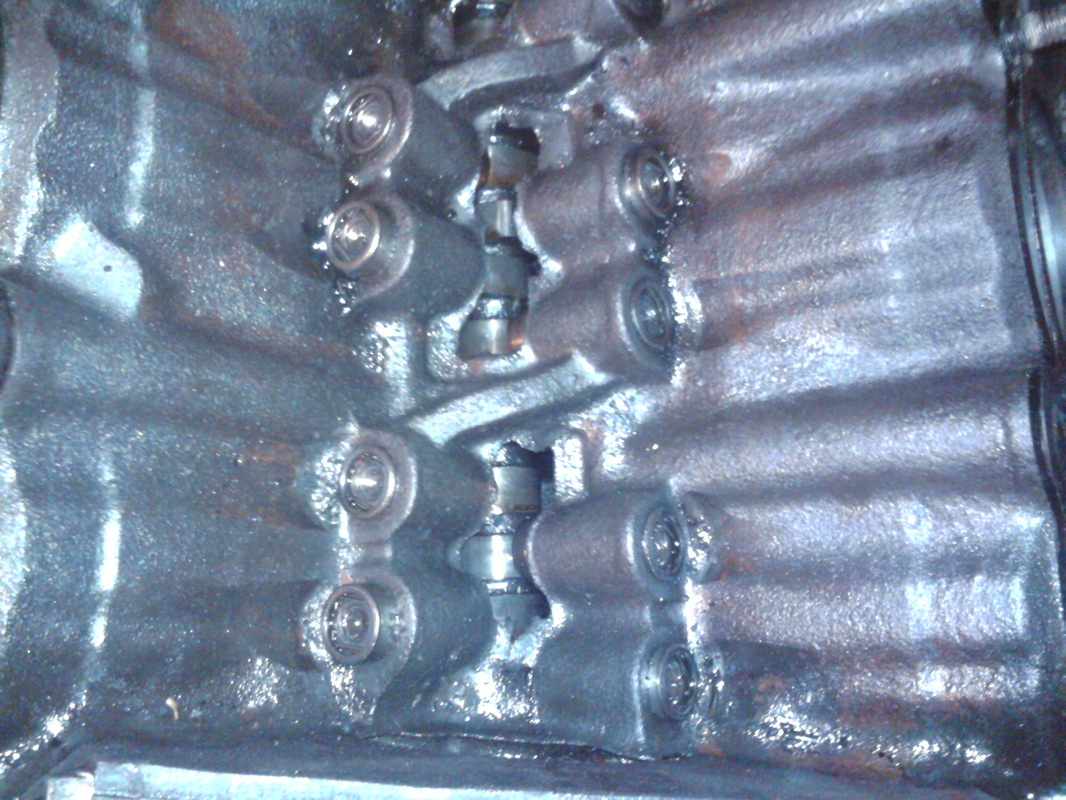
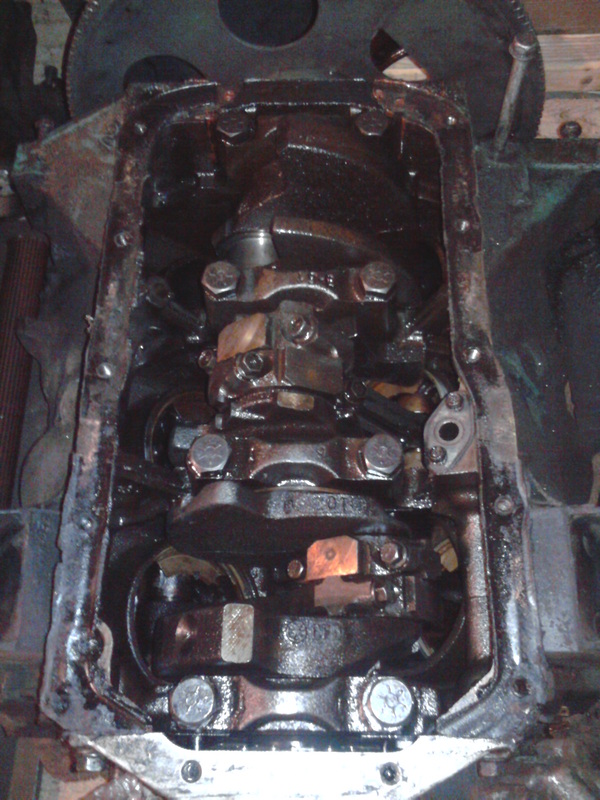
Turn Engine Over.
This will drain all the rest of the fluids out and then take the oil pan off exposing the crankshaft.
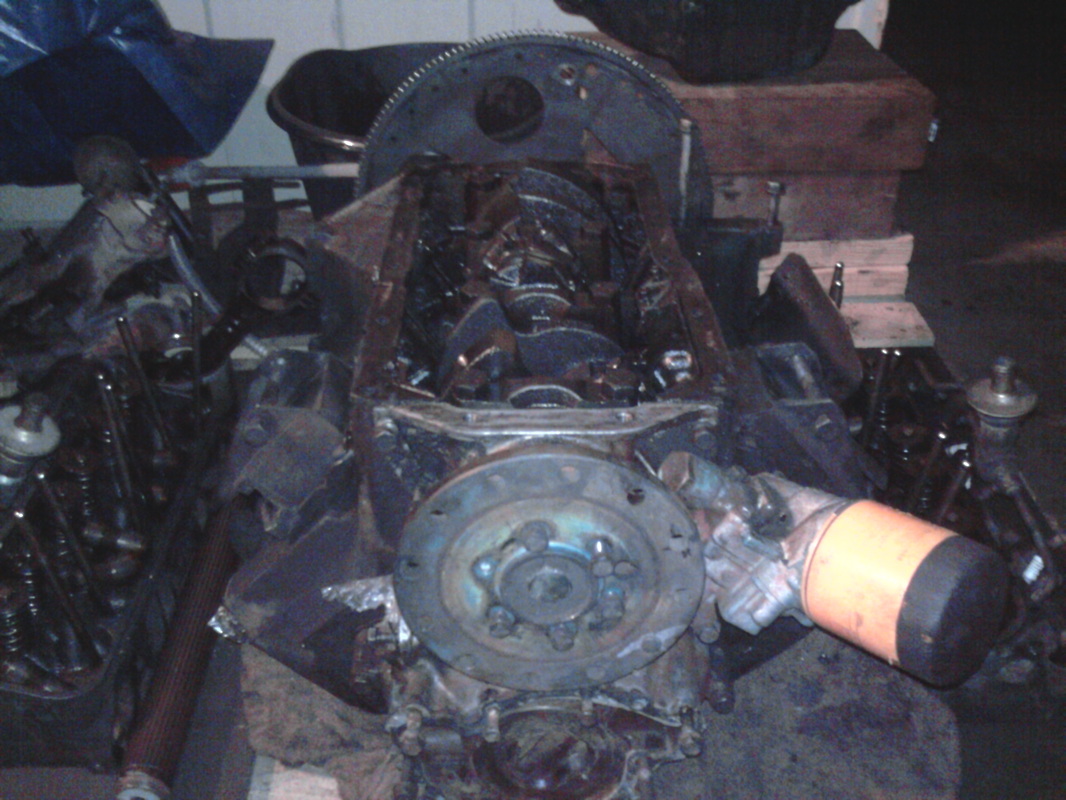
Crankshaft, Main Caps and Piston Rods.
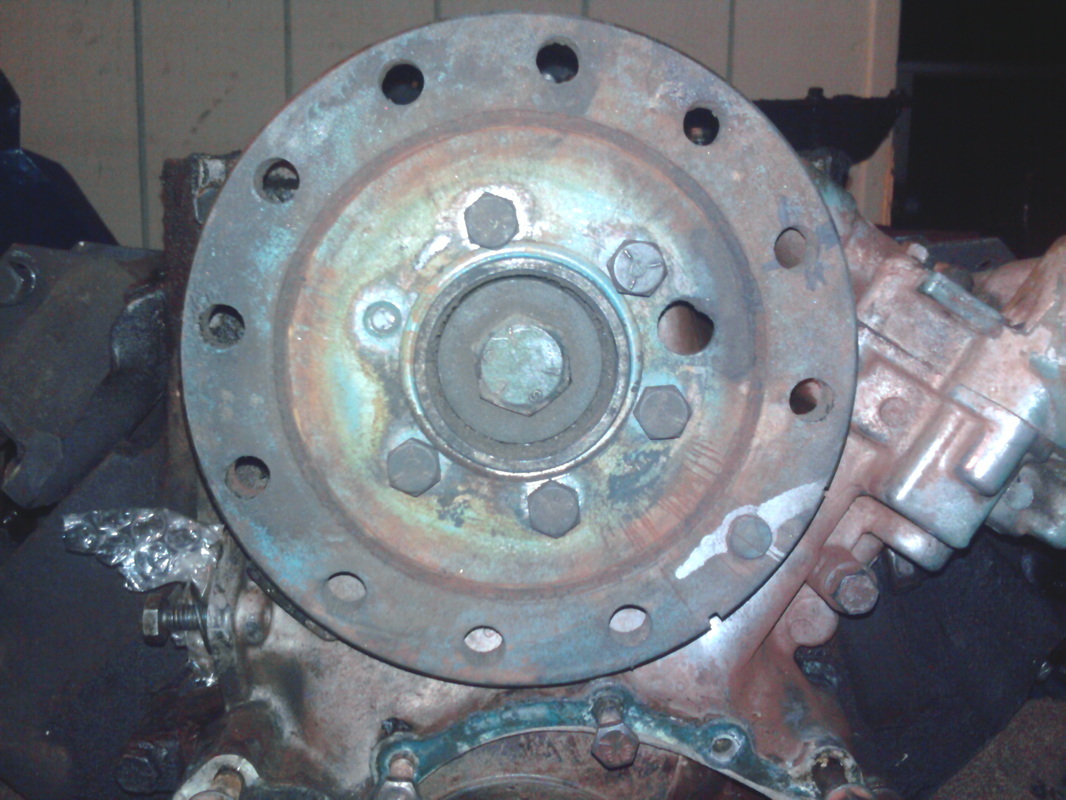
Remove Harmonic Balancer (BOLTS ONLY FIRST)

The main bolt has 111-225lbs of torque on it not including years of sitting on here, it will take allot to break this bolt free. You have to either use an impact wrench or what I used was a leverage bar on my socket wrench, basically take a long hollow bar that will fit over your wrench handle to make your wrench longer, it gives you way more leverage.
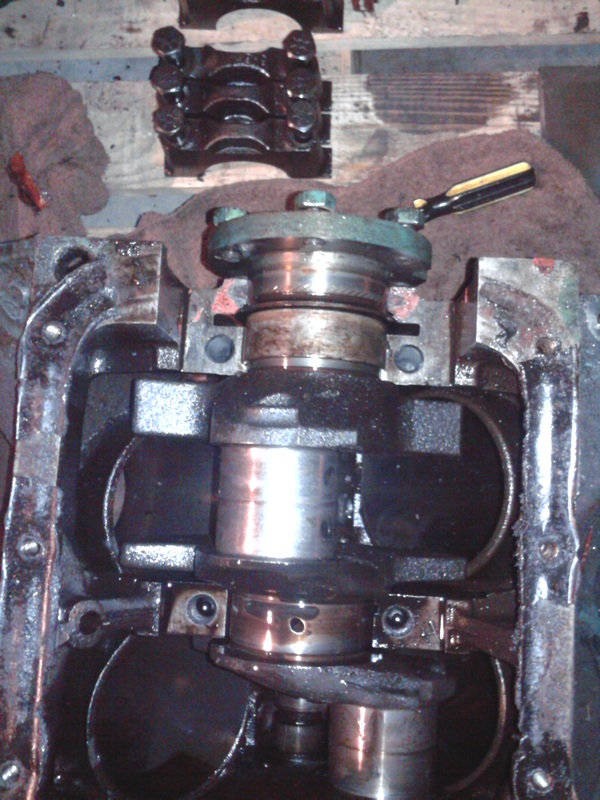
Trick to stop crankshaft from rotating!
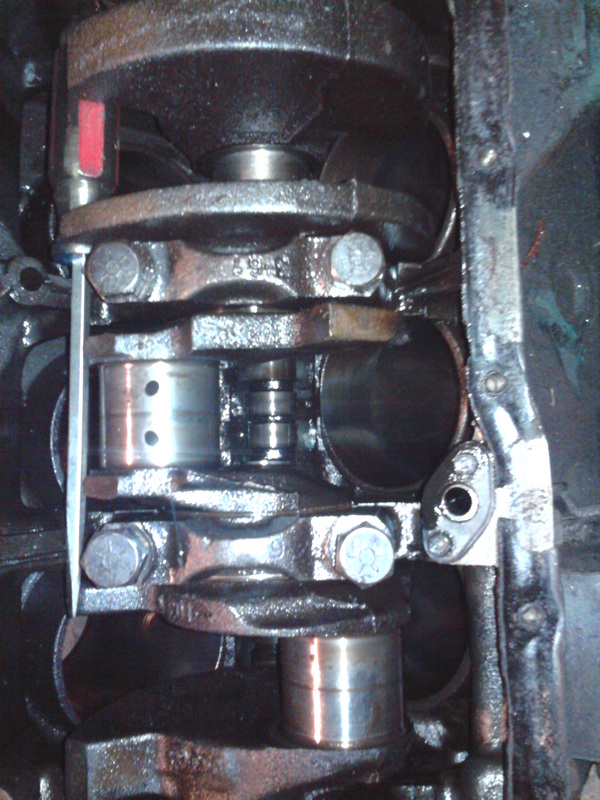
This works for removing the harmonic balancer bolts and the flywheel to stop the crankshaft from spinning while removing the bolts. You can put a heavy duty screwdriver or something similar as seen in far left part of the pic in between the crankshaft counter weights and the side of motor to keep the crankshaft from spinning.
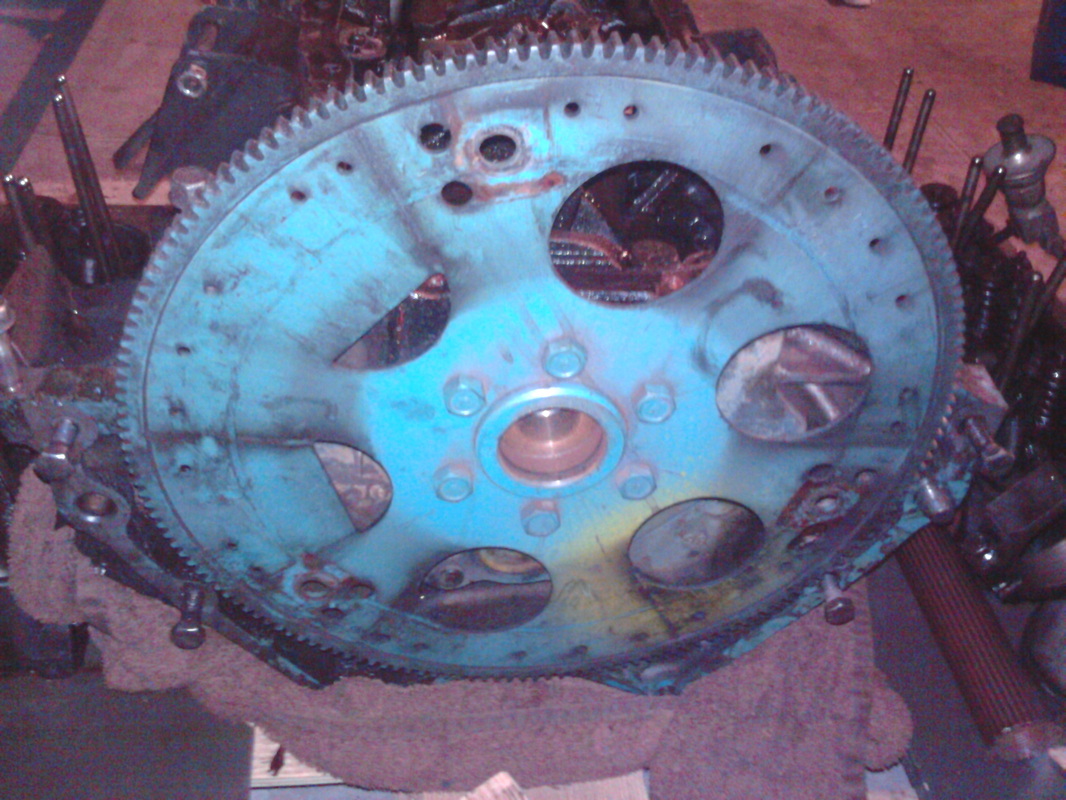
Remove Flywheel/Flexplate
Removing PRESS FITTED Harmonic Balancer
When the main bolt is removed they machine press-fit the balancer onto the crankshaft and it is no easy task taking it off, you will need to rent a harmonic balancer remover tool or also called a puller from your local auto parts store.
!!!BE CAREFUL NOT TO DAMAGE THE INNER THREADS OF THE CRANK SHAFT WHEN INSERTING AND USING THE HARMONIC BALANCER PULLER!!!
!!!BE CAREFUL NOT TO DAMAGE THE INNER THREADS OF THE CRANK SHAFT WHEN INSERTING AND USING THE HARMONIC BALANCER PULLER!!!
Remove Timing Cover
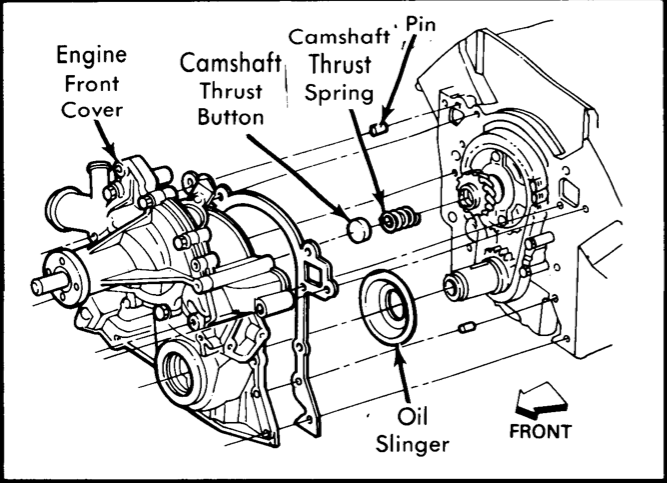
Remove the timing cover to expose the timing gears and chain. REMEMBER TO PLACE THE BOLTS BACK IN THE BOLT HOLES THEY CAME OUT OF, THIS HELPS YOU KNOW WHICH BOLT GOES WHERE.
Remove Distributor Drive Gear
Timing Chain
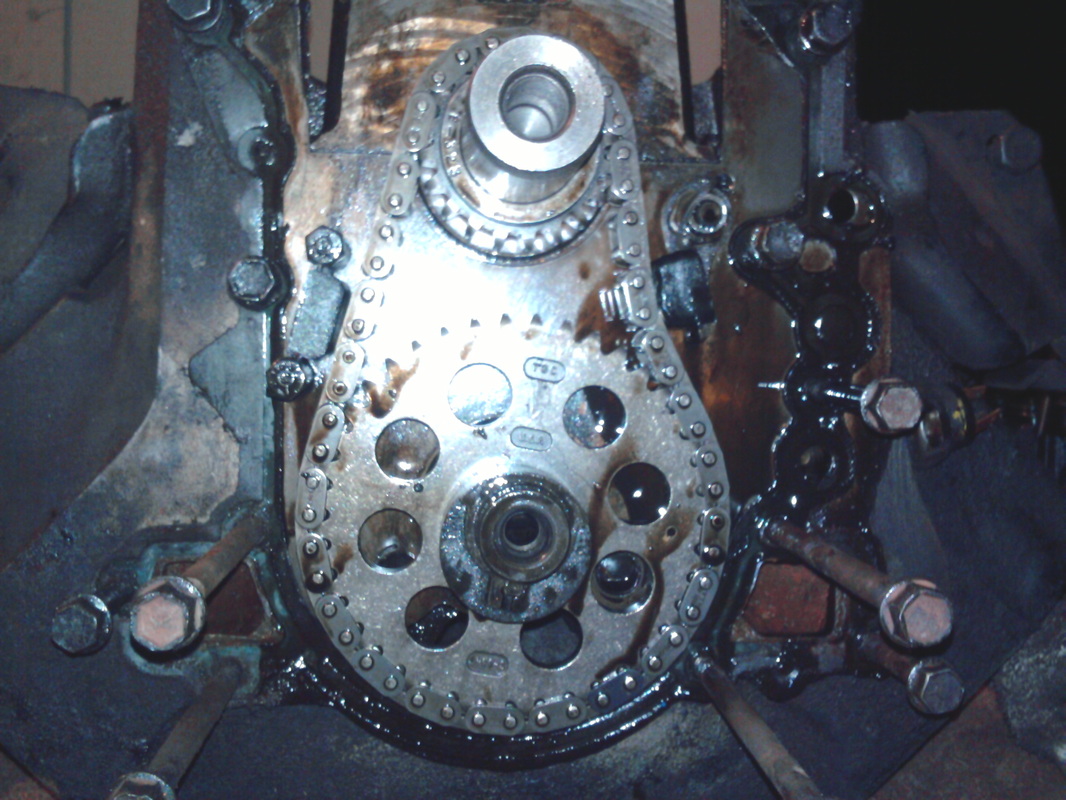
Now you've taken off the timing cover that exposes the timing chain and gears. Notice I'm still putting the bolts back in the holes they came out of so I don't lose them or mix them up.
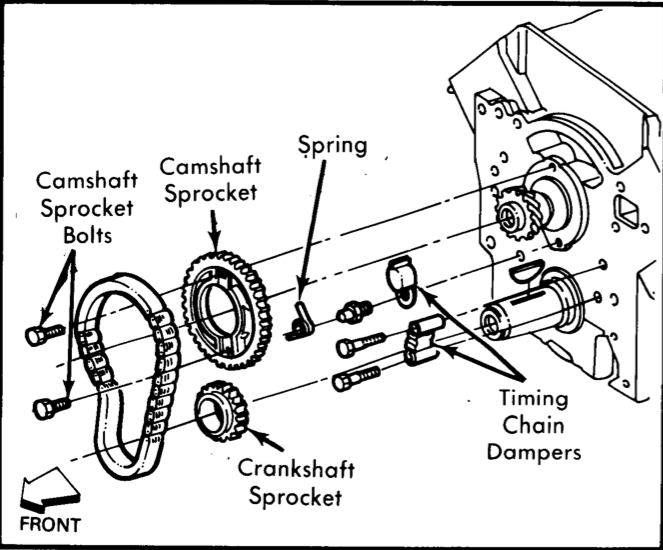
Remove the Gears W/ Chain Simultaneously

To remove both gears at the same time with the chain being careful not to bend the chain the large gear can be removed by placing two screwdrivers behind it pulling and wiggling it forward but you must remove both the small and the large gear off at the same time inching them off alternating between the two, moving each gear out a little at a time so you don't damage or bend the timing chain.
(When reinstalling the timing chain do the same, inch on gears with chain and make sure you line up timing marks perfectly.) After you line up the timing marks with the chain on and everything in place you can now freely spin the crankshaft to do what you need to do like reinstalling the pistons etc.
(When reinstalling the timing chain do the same, inch on gears with chain and make sure you line up timing marks perfectly.) After you line up the timing marks with the chain on and everything in place you can now freely spin the crankshaft to do what you need to do like reinstalling the pistons etc.
Diagram of Timing Parts
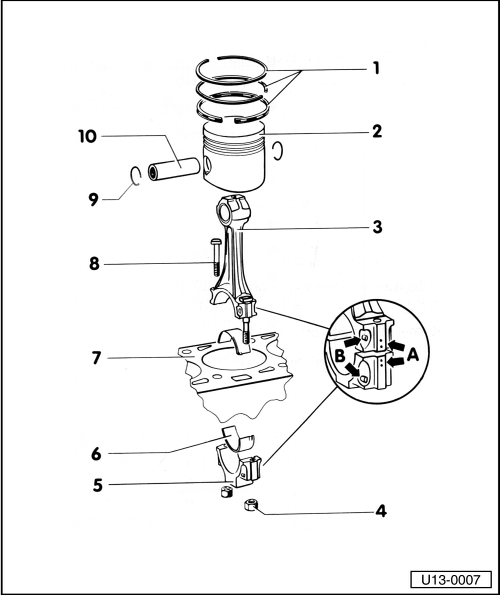
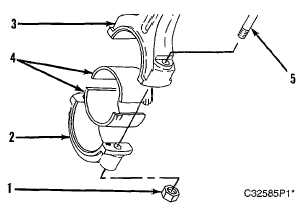
Exploded View of Piston Connecting Rods and Bearings.
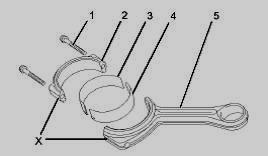
This is the connecting rod and bearings, it is the arm of the piston.
#1 bolts
#2 is the Cap
#3 and #4 are the Bearings
#5 is the Connecting Rod
#1 bolts
#2 is the Cap
#3 and #4 are the Bearings
#5 is the Connecting Rod
Remove Piston Connecting Rod Caps

Now you need to remove the Piston Connecting Rod Caps, just unbolt and wiggle out. Some bearings will stay stuck under the cap or be left on the crank journal, be very careful removing the bearing from the crank journal, most people will want to use a flat head screwdriver to remove the bearing from the journal (I suggest a hard piece of plastic) just be very careful not to slip and scratch the crank journal surface.
Push out Pistons and Connecting Rods.
You can use the back wooded end of a hammer handle to push out the piston being careful not to scrape the crank journal with either the bolts or the hammer handle. It will get hard to push out the pistons when it reaches the top just push through it.
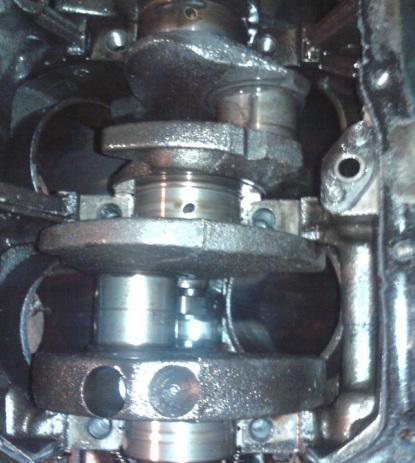
Crankshaft Overview
This shows what the journals are and part names.
MAKE SURE YOU GET AN ODD FIRE CRANK, FLYWHEEL, CAMSHAFT AND DISTRIBUTOR IF YOU ARE REPLACING THEM.
!!!!THE EVEN FIRE CRANKS, FLYWHEELS, DISTRIBUTORS AND CAMSHAFTS ARE DIFFERENT FROM THE ODD FIRE!!!!! ((ALWAYS CHECK CASTING NUMBERS))
MAKE SURE YOU GET AN ODD FIRE CRANK, FLYWHEEL, CAMSHAFT AND DISTRIBUTOR IF YOU ARE REPLACING THEM.
!!!!THE EVEN FIRE CRANKS, FLYWHEELS, DISTRIBUTORS AND CAMSHAFTS ARE DIFFERENT FROM THE ODD FIRE!!!!! ((ALWAYS CHECK CASTING NUMBERS))
Remove Crankshaft Main Caps
The metal rectangle looking things bolted down with the concave dips are the main bearing caps that bolt the crankshaft into position and you must remove these to remove the crankshaft. It will take allot of force, use a leverage bar or impact wrench.
Caps Removed
Picture of the Caps removed exposing the main crank journal surfaces.
Rear Main Cap
Luckily the main caps have numbers and arrows on the top of the cap so you don't forget which goes where. #1 goes up front with arrow facing to the front of the engine #2 next and so on, the rear cap is pretty distinguishable it is larger and shaped different and won't fit anywhere else, remove the rear cap. Now you can remove the crankshaft. Some bearings will stay in the caps or be stuck on the crank journal and some will stick in the motor journal, remove them, always keeping everything set aside in the same order it came out ONLY if you are planning on reusing any parts, ASSUME YOU ARE. DO NOT USE ANYTHING THAT WILL SCRATCH THE JOURNAL SURFACES WHEN REMOVING THE BEARINGS, ANY SCRATCHES ON THE JOURNALS WILL DESTROY YOUR NEW BEARINGS AND YOUR BEARINGS WON'T LAST VERY LONG.
REMEMBER TO REMOVE THE FLYWHEEL, TIMING GEARS AND CHAIN.
MAKE SURE YOU GET AN ODD FIRE CRANK, FLYWHEEL, CAMSHAFT AND DISTRIBUTOR IF YOU ARE REPLACING THEM.
!!!!THE EVEN FIRE CRANKS, FLYWHEELS, DISTRIBUTORS AND CAMSHAFTS ARE DIFFERENT FROM THE ODD FIRE!!!!! ALWAYS CHECK THE CASTING NUMBERS
REMEMBER TO REMOVE THE FLYWHEEL, TIMING GEARS AND CHAIN.
MAKE SURE YOU GET AN ODD FIRE CRANK, FLYWHEEL, CAMSHAFT AND DISTRIBUTOR IF YOU ARE REPLACING THEM.
!!!!THE EVEN FIRE CRANKS, FLYWHEELS, DISTRIBUTORS AND CAMSHAFTS ARE DIFFERENT FROM THE ODD FIRE!!!!! ALWAYS CHECK THE CASTING NUMBERS
Remove Rear Main Seal
If you are replacing your rear main seal and it is recommended to, this is one way you can do it. I would recommend taking the crank out so you don't damage the bearing journal surface because you have to get tools right up against it but if you are just replacing the seal and not removing the crankshaft do this method that is in the pic.
Reinstall Rear Main Bearing Seal
To reinstall the seal, stuff the fabric seal back in the grove and use a hammer end to press and form back into grove, also look at the pic, cut the excess off so it is flush with the base of the metal, there are also neoprene seals that go on the side of the rear main cap that are sometimes held in with a metal pin as well.
Resealing Rear Main Cap
When reinstalling the rear main cap apply the sealer on the designated surfaces in the pic.
Crankshaft Removed
Now you can replace any parts you removed and just reverse the steps when putting everything back together. When installing a new crankshaft and bearings make sure there is NO DUST OR DEBRIS GETTING IN THE ENGINE AND ON THE BEARINGS AND JOURNAL SURFACES.
You can use Break Cleaner, it breaks down grease and leaves surfaces clean. Wear a filter mask for lung safety, break cleaner is very toxic.
MAKE SURE YOU GET AN ODD FIRE CRANK, FLYWHEEL, CAMSHAFT AND DISTRIBUTOR IF YOU ARE REPLACING THEM.
!!!!THE EVEN FIRE CRANKS, FLYWHEELS, DISTRIBUTORS AND CAMSHAFTS ARE DIFFERENT FROM THE ODD FIRE!!!!!
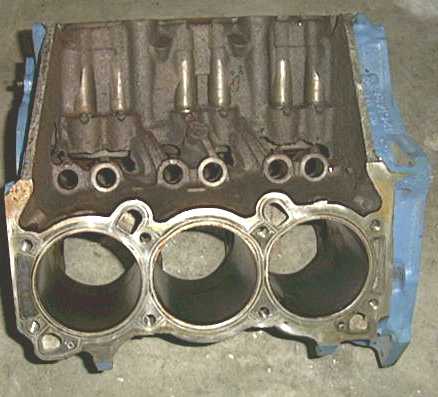
Cylinder Wear and Build Up.
There will also be a small build up of gunk here, you can rent a tool that can remove this build up, ask your local auto parts store. If this build up is bad you can damage your piston rings when reinstalling the pistons. I personally did not need to clean mine because mine were not bad but some engines will have different amounts of build up than others.
Reinstalling Piston Rings
This is the placement of Piston Ring Gaps and which way they should be facing in relation to the camshaft, the Notch is facing toward the front of the engine, study thoroughly.
Reinstalling Pistons Positioning
Self explanatory. The 231 pistons have notches on the top and a dimple on one side making it easy to reinstall and know which direction they go back in the engine.
Reinstalling Pistons Positioning
Check Piston Ring Gap with Feeler Gauge.
Place a piston ring into the cylinder and push it down evenly using the top of a piston pushing down the ring about an inch into the cylinder, put a feeler gauge in the gap of the piston ring and make sure it is between the specs of the engine requirements. I posted toward the bottom of the page all the specs.
THE TOOL IN THE PIC IS A FEELER GAUGE. PURCHASE ONE THAT WILL RANGE THE SPECS YOU NEED.
If the specs are off, it is recommended to file down one side of the ring making sure that there is no sharp edges or debris left when reinstalling.
THE TOOL IN THE PIC IS A FEELER GAUGE. PURCHASE ONE THAT WILL RANGE THE SPECS YOU NEED.
If the specs are off, it is recommended to file down one side of the ring making sure that there is no sharp edges or debris left when reinstalling.
Piston Ring Clearances
Same step as above but for the side clearance of the piston ring sitting in the piston, put a feeler gauge in the ring and make sure it is between the specs of the engine requirements. I posted toward the bottom of the page all the specs.
Exploded View of Piston
Notice the piston ring gaps are alternating, this allows air in and frees up movement but does not allow the oil to get to the top where the fuel is.
Piston Ring Indicators
Most rings will have dots that will indicate that it faces up or they will come with a chart that explains based off of groves on the rings which way they face up and which order they go on from top to bottom.
Honing or Glazing a Cylinder.

I skipped this step but it is recommended to do this. I guess if you want to be that thorough you can but I was tight on funds so some things I had to skip.

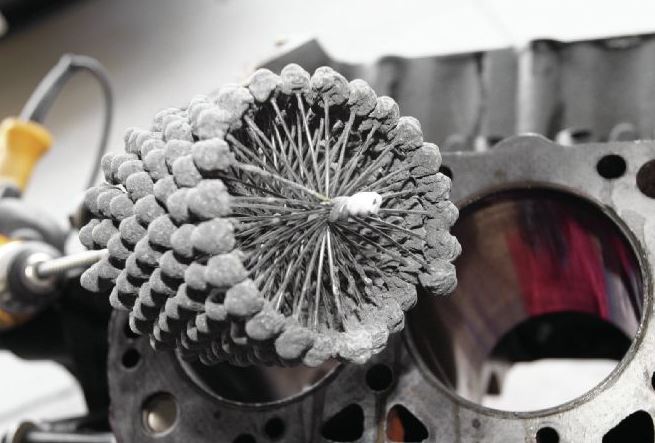
Honing or Glazing a Cylinder.
This is what the cylinder is suppose to look like after glazing the cylinder. Honing a cylinder requires you to use a stone tool that looks like a tripod like the pic above with stones on each end that slide into the cylinder used to resurface the cylinder wall then you take another tool that is soft but firm and abrasive to scuff the cylinder wall as seen in this pick or you can take it to a machine shop and they can re-bore your cylinders if you can afford that but then you will need to purchase new sized pistons to match the new bore size of your cylinders which becomes very costly, I have rebuilt several engines now and I never hone a cylinder and all my engines run great. I would do this only if there was allot of carbon built up or wear but cylinders are usually fairly smooth and don't need this process.
Reinstalling Pistons
LUBRICATE THE CYLINDER WALLS WITH MOTOR OIL OR ASSEMBLY LUBE LIGHTLY BEFORE INSTALLING PISTONS. Use a Piston Ring Compressor, you can rent one from your local auto parts store. Synch down piston ring compressor around piston rings and place the piston inside the cylinder with the ring compressor firmly flush to the head mating surface as shown in the pic, REMEMBER! make sure your piston is facing the right direction the whole time, the other tricky thing is to remember to have your bearing on your connecting rod, sometimes they will fall off while hammering the piston back in, refer to the photos of the Piston Positioning a few pics up, tap in the piston with the wooded end of a hammer. MAKE SURE YOU ARE CHECKING TO SEE THAT YOU ARE NOT BANGING THE CONNECTING ROD INTO THE CRANK JOURNAL AND SCRATCHING IT, YOU HAVE TO KEEP CHECKING BACK AND FORTH AND LINE UP THE CONNECTING ROD IN PLACE.
(It will be really hard to get the piston in towards the end when it starts to become flush, just keep going but make sure your not damaging the rings, if you are having to hit the piston really hard that means the ring is being banged up against the top deck and the top of the cylinder wall and you could break it so do not overly force in the piston.... THIS PART CAN BE REALLY FRUSTRATING BE VERY PATIENT YOU MAY HAVE TO REDO EACH PISTON SEVERAL TIMES.)
IF YOU FORGET TO PUT THE BEARING ON THE CONNECTING ROD NO WORRIES YOU CAN SIMPLY SLIDE IT ON AND AROUND THE CRANK JOURNAL WITH THE PISTON ROD IN PLACE UP NEXT TO THE CRANK JOURNAL, PUT SOME OIL ON THE CRANK JOURNAL BUT NOT ON THE CONNECTING ROD JOURNAL TO HELP SLIDE THE BEARING AROUND THE CRANK JOURNAL, MAKE SURE THE BEARING NOTCH LINES UP WITH THE CONNECTING ROD NOTCH, TAP DOWN PISTON TOWARD THE CRANK AGAIN TO MAKE SURE THE BEARING IS FIRM INSIDE THE CONNECTING ROD AND UP AGAINST THE CRANK JOURNAL, DON'T PUT OIL ON THE BACK PART OF THE BEARING, ONLY ON THE SURFACE THAT IS GOING TO GO AROUND THE JOURNAL.
Bearing Placement
As you can see the bearings #4 have notches or tabs on them that match the underside of the connecting rod surface and cap surface, it is hard to mix them up but not impossible so be very careful to check that the notches fit in the notches on the underside of the cap and rod.
MAKE SURE ALL SURFACES ARE EXTREMELY CLEAN, NO OIL SOULD GET ON THE BOTTOM SIDE OF THE BEARING AND THE CONNECTING ROD JOUNAL SURFACE, OIL CAN GO ON THE TOP PART OF THE BEARING, JUST THINK, YOU WANT TO LUBRICATE THE SURFACE THAT WILL GLIDE OR SPIN AROUND THE CRANKSHAFT BUT YOU WANT THE BEARING TO BE SECURE IN THE CAP AND ROD SO IT MUST BE DRY ON THE UNDERSIDE AS TO NOT SLIP OUT OF THE SURFACE IT'S BEING PLACED IN.
You can use break cleaner to clean surfaces but wear a filter face mask.
Checking Bearing Clearance
This is a bearing cap with the bearing in the cap, engine bearings are flat simi-circles not like the metal balls we are used to thinking are bearings. To check your bearing clearance you bolt the cap and bearing back onto the connecting rod connecting the piston back to the crankshaft and torque down to specs but before you do that you place a piece of plastigauge on the CLEAN JOURNAL surface then bolt down the cap and bearing, do this step with the main caps too. Then you unbolt the cap and the plastigauge is smashed leaving an indicator as shown in the pic, the plastigauge package will include a reader strip, make sure it meets the specs of the engine requirements for both the main caps and the connecting piston rod caps.
POSTED TOWARDS THE BOTTOM OF THIS PAGE ARE THE CLEARANCE SPECS YOU NEED.
REFER TO VIDEOS ONLINE FOR ANY FURTHER ASSISTANCE.
POSTED TOWARDS THE BOTTOM OF THIS PAGE ARE THE CLEARANCE SPECS YOU NEED.
REFER TO VIDEOS ONLINE FOR ANY FURTHER ASSISTANCE.
Checking Bearing Clearance

Reinstall the Bearing and Cap
As shown put assembly engine lube on the top surface of the bearing only, do not put oil or assembly lube on the underside of the bearing or cap surface that needs to stay dry and clean. MAKE SURE ALL BEARING SURFACES AND JOURNAL SURFACES ARE VERY CLEAN FROM DUST AND DEBRIS BEFORE INSTALLING, EXCEPT AFTER CLEANING YOU CAN APPLY ASSEMBLY LUBE ON THE TOP BEARING SURFACE ONLY AND THE CRANKSHAFT JOURNAL SURFACE.
YOU CAN USE BREAK CLEANER TO CLEAN SURFACES BEFORE APPLYING LUBE, USE A FILTER FACE MASK TO PROTECT AGAINST INHALING HARMFUL CHEMICALS, YOU WILL USE ALLOT OF BREAK CLEANER THROUGH THE ENGINE REBUILD.
Before bolting caps and heads back down, SOAK or dip your cap BOLT THREADS in oil. Later FOR THE HEAD BOLTS when doing the heads put a water sealant on the bolt threads that are ONLY going into WATER JACKET/COOLANT HOLES.
Clearance Chart
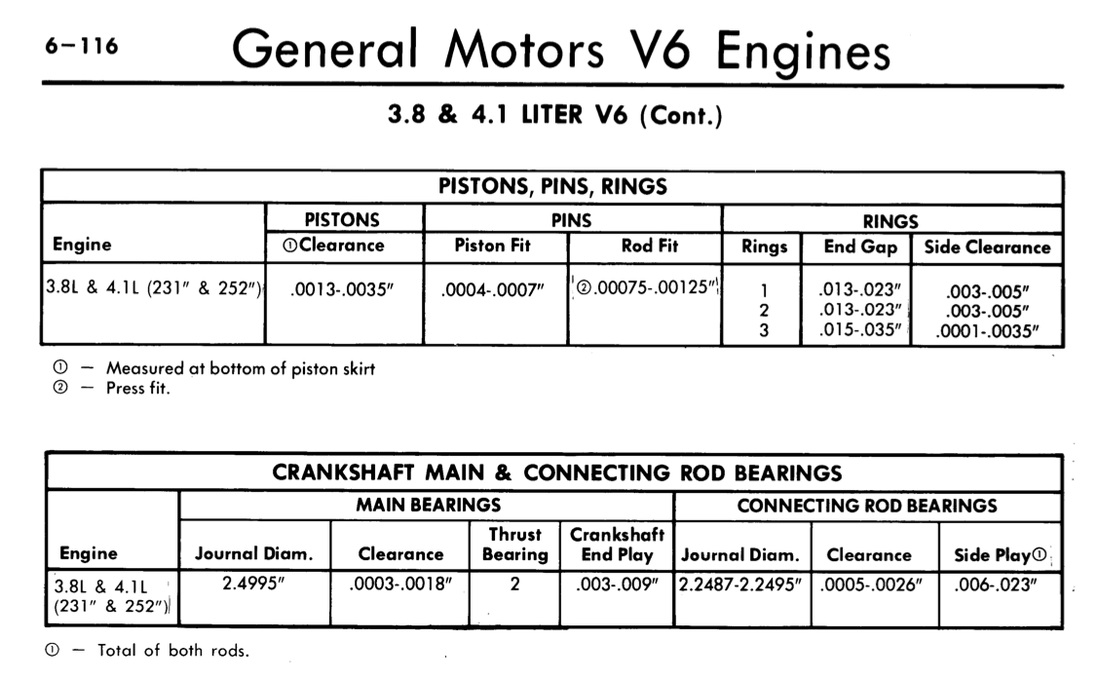
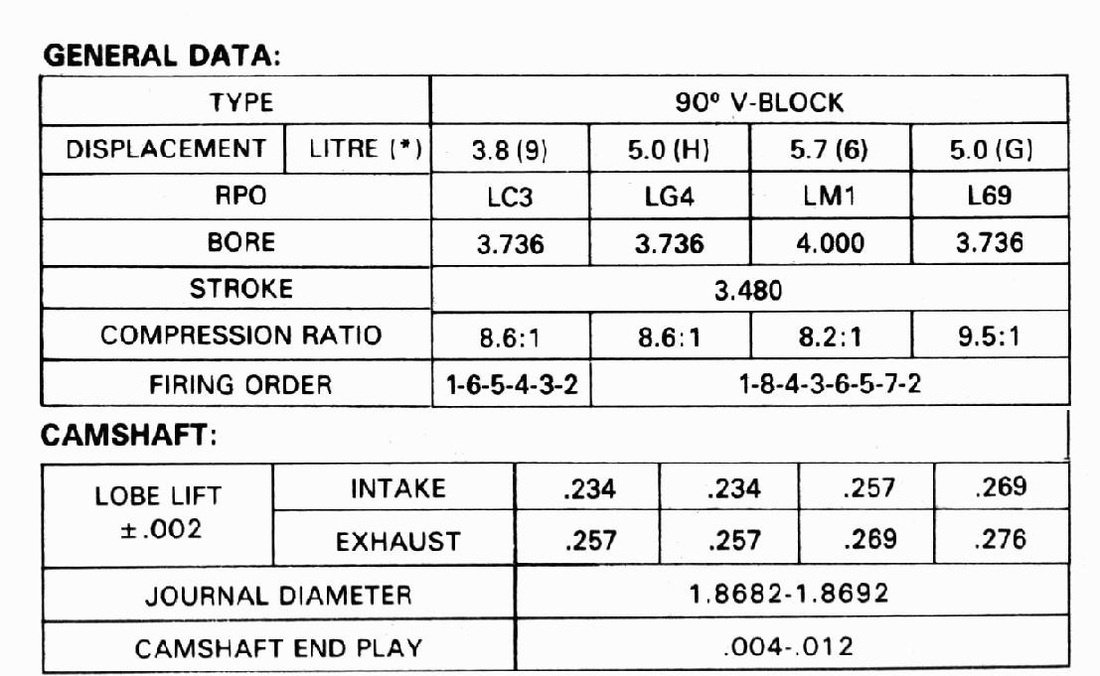
Cam, Valve and Engine Specs
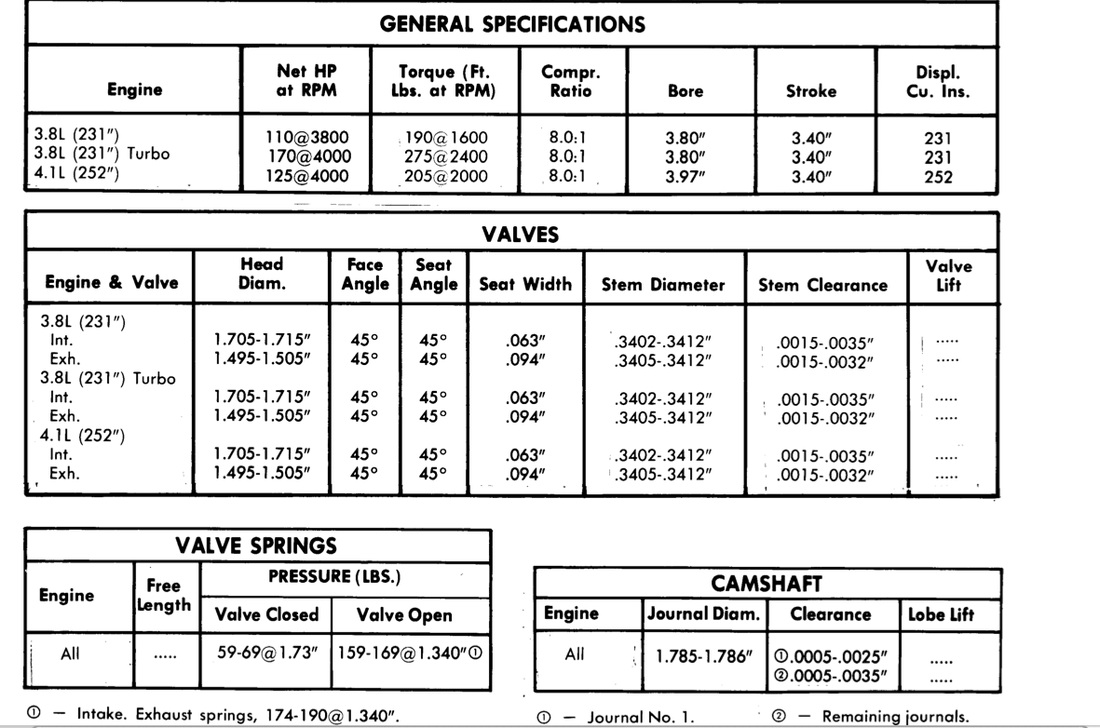
Camshaft Lobe Lift and General Specs
Changing Out Valve Seals
Here you can change out the valve seals and the springs and retainers if you would like, my valve seals needed changing, it is recommended if you are this far anyways, mine were really bad. Bad seals can result in excessive smoking and they tend to get hard and crack and then break off in little pieces and get in your motor and cause problems.
YOU WILL HAVE TO RENT A VALVE SPRING REMOVER TOOL FROM YOU LOCAL AUTO PARTS STORE.
YOU WILL HAVE TO RENT A VALVE SPRING REMOVER TOOL FROM YOU LOCAL AUTO PARTS STORE.
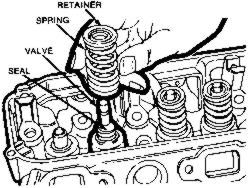
Valve Stem Seal
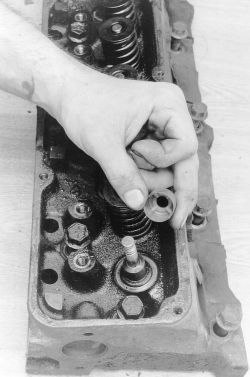
When you have the springs removed push the valve seal down snug over the valve stem until it reaches the base. The valve seals only go on every other valve stem, If I recall it's the exhaust valve, not 100% sure so do some research, or just take one spring off at a time and see which valve has a seal and which one doesn't.
In order to remove the spring you must push down the spring with a spring compressor tool and then take out the retainers. Retainers are 2 little tab like pieces of metal that sit in the spring top hole and fit around the valve stems. When the spring is decompressed the retainers interlock the valve stem with the spring. You can use a magnet to more easily remove the retainers when you compress the spring down far enough to where the retainers can be removed, then the spring will come off revealing if there is a seal or not, replace the seals one at a time so you do not forget what valve has a seal.
YOU WILL HAVE TO RENT A VALVE SPRING REMOVER TOOL FROM YOU LOCAL AUTO PARTS STORE.
Valve Stem Seal
Sometimes brown color or different color, still the same function.
Clean All Surfaces
Clean all mating surfaces like the head surfaces (ANYWHERE THERE IS GOIONG TO BE A GASKET) without scratching!! Surfaces must be extremely clean when you reinstall all the gaskets.
IN ADDITION BREAK CLEANER WORKS WELL WITH REMOVING GRIME AND OILY SUBSTANCES. USE A FILTER FACE MASK TO PROTECT AGAINST INHALING HARMFUL CHEMICALS.
IN ADDITION BREAK CLEANER WORKS WELL WITH REMOVING GRIME AND OILY SUBSTANCES. USE A FILTER FACE MASK TO PROTECT AGAINST INHALING HARMFUL CHEMICALS.
REBUILD ENGINE REVERSING ALL STEPS IN THIS FORUM

REVERSE STEPS TO ASSEMBLE ENGINE, making sure to install the crank and refer to photos, then install timing chain and gears and refer to photo's etc. Keeping everything in order and being organized will greatly help. Check that you LINE UP TIMING MARKS ON THE GEARS PERFECTLY, then check the positioning of the crankshaft and camshaft and pistons etc in the same order reversed as shown up top referring to the photos. Clean all surfaces for new gaskets and bearings, replace any parts that need to be replaced. Make sure you torque bolts to specs and sequence for everything. I will post below torque specs and other helpful pics. Hope it's been fun and you got allot of useful info, enjoy and thank you for reading my forum!
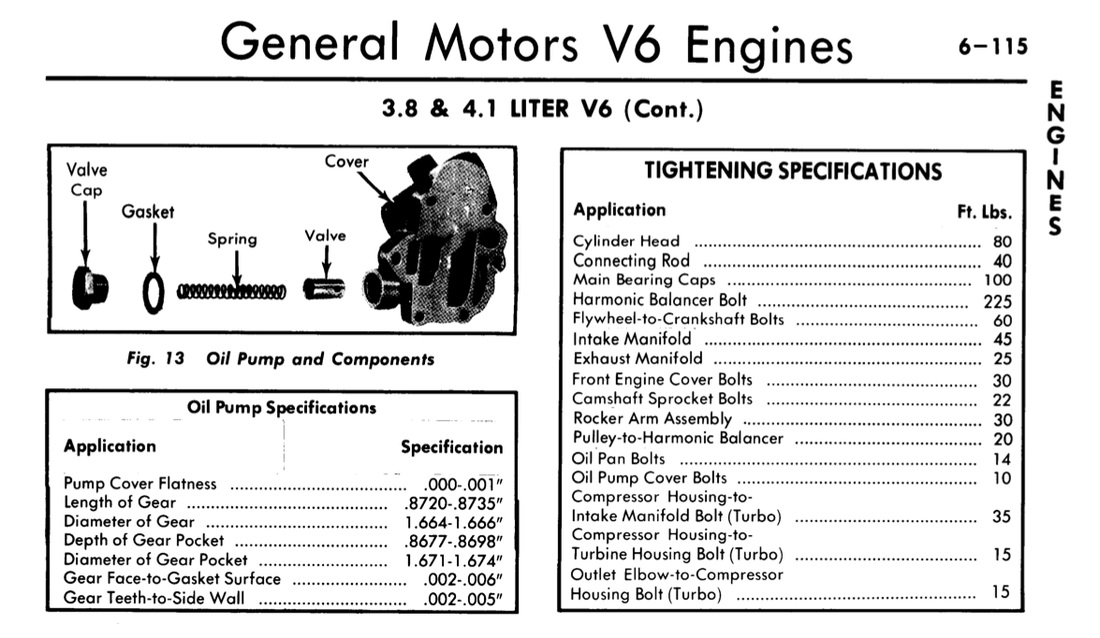
Torque Specs
Intake Bolt Down Sequence
TORQUE DOWN ACCORDING TO THE NUMBERS AND REFER TO SPECS
Head Torque Sequence
TORQUE DOWN ACCORDING TO THE NUMBERS AND REFER TO SPECS
Firing Order for ODD FIRE ENGINE
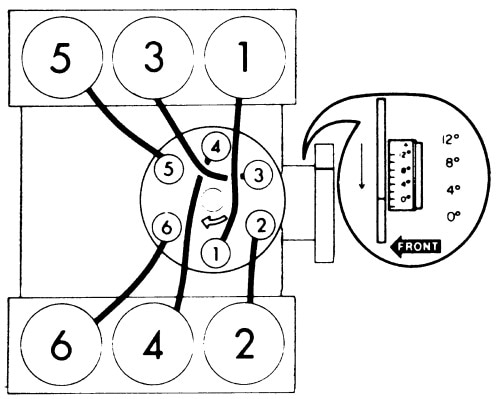
Firing Order is 1-6-5-4-3-2 going clockwise
Timing at 12 degrees before top dead center (BTDC)
WHAT YOU NEED TO DO TO SET YOUR TIMING:
Purchase a decent timing light.
You are going to need a big socket 1'' OR UP TO 1'' 1/8 and a wrench to move the crankshaft and motor by hand turning the motor over using the harmonic balancer bolt.
Remove your #1 spark plug. Crank the engine over turning the crankshaft with the wrench and socket, YOU CAN ROTATE THE ENGINE IN EITHER DIRECTION TO GET THE #1 PISTON TO WHERE IT NEEDS TO BE BUT YOU NEED TO MAINLY CRANK THE ENGINE CLOCKWISE .
The #1 Piston has to be on the compression UPstroke... AFTER the intake valve has opened, take the valve cover off to view the valve moving, it's the 2nd spring back at the front of the engine, when the intake valve moves down it is now open, check to see if the #1 piston is at the top after the intake valve has moved down, do this by feeling in the #1 spark plug hole with a short flat head screwdriver by inserting the screwdriver into the #1 spark plug hole, if you don't feel the top of the piston you will have to do another revolution until the piston is at the top then you need to set the timing mark on the balancer to 0 degrees on the timing indicator, either back it up a little or turn it forward a little, it's ok to turn either direction a little.
!!!! TRICK !!!!
(((( !!! Another trick to know if you are on the compression upstroke is to get a hose (heater core hose works 5/8'' or 3/4'') that will squeeze into the #1 spark plug hole, tape a balloon or a rubber glove around one end of the hose, this will blow the balloon up or glove up as the compression upstroke is happening, shove the one end of the hose that is open into the #1 spark plug hole and CRANK THE ENGINE OVER BY HAND CLOCKWISE, the balloon will suck in on the downstroke and then start to expand when the piston is on the compression upstroke, keep turning the engine until your timing mark is at 0 degrees and the balloon is expanded !!! )))) BLAMO It's that easy!!!
PUTTING THE DISTRIBUTOR INTO PLACE IS KEY AND CAN BE VERY FRUSTRATING. THE IDEAL IS TO POINT THE ROTOR TIP AT THE DISTRIBUTOR CAP #1 TERMINAL LEAD THAT IS GOING TO BE DESIGNATED FOR YOUR #1 CYLINDER. When the distributor is seated all the way down in place the rotor tip should be facing just before or at your #1 terminal on your distributor cap when you put the cap back on (THE ROTOR ALSO TURNS CLOCKWISE AS THE MOTOR TURNS CLOCKWISE AS WELL). YOU FIRST HAVE TO FIND OUT WHICH WAY THE VACUUM ADVANCE IS GOING TO FACE, IT BEST FIT FOR ME WITH IT FACING OUT TOWARDS THE RADIATOR FOR MAXIMUM TURNING AND MOVEMENT TO ADJUST THE TIMING. You have to make sure you have enough room to turn the distributor left and right in both directions to adjust the timing. Now take a long flat head screwdriver and a flashlight to see the oil pump stem and turn the oil pump stem inside the timing cover, it can take 30x's sometimes.... IT REALLY REALLY SUCKS!!! this allows you to seat the distributor all the way down. My trick was to do a "1/4" turn of my hand or wrist, that seemed to work the best. YOU MUST MAKE SURE THE DISTRIBUTOR SNAPS ALL THE WAY DOWN!!!! you can check the mating surfaces of the distributor and the timing cover making sure they are flush, if there is a slight gap between them then the distributor is not snapped or seated all the way down, if it doesn't go all the way down you will have to keep pulling out the distributor and turning the oil pump stem a little at a time and then placing the distributor back in and trying again until the distributor goes all of the way in and seats down completely AND!! IS POINTING IN THE DIRECTION OF YOUR #1 TERMINAL WHEN YOU DISTRIBUTOR CAP IS ON. YOU SHOULD HAVE THE DISTRIBUTOR CAP OFF THOUGH WHILE DOING THIS TO SEE WHICH WAY THE ROTOR IS POINTING AND JUST TAKE NOTE OF HOW THE CAP WILL SIT ON THE DISTRIBUTOR AND WHERE EXACTLY THE #1 TERMINAL IS IN RELATION TO THE ROTOR, IF NOT TAKE OFF THE CAP WHILE DOING THIS.
- To set you timing, remove the #1 spark plug.
- Take a short flat head screw driver and place it in the spark plug hole, not a long screw driver.
- Take your valve cover off so you can see your rockers and valves move OR do the balloon trick mentioned in the above paragraph.
- Then rotate the engine by hand slowly with a socket to the harmonic balancer bolt turning the engine clockwise.
- Watch to see the 2nd valve spring being pushed down AND the screw driver has moved but not jamming the screwdriver, reposition the screw driver so it doesn't jam when the piston does start to come up, you will have to reposition the screw driver a few times until the process is done so it doesn't jam (turn the motor slow, do not crank it really fast you will jam the screwdriver and possibly destroy the spark plug threads and the piston)
- When the intake valve has opened (the 2nd valve spring) then watch for your screwdriver to move again, when it moves the piston will be on the upstroke and you can tell because you can feel the piston with the flat head screw driver, just make sure you don't jam the screwdriver in the hole. You want the piston to be at Top Dead Cent (TDC) on the UP STROKE after the intake valve has opened, so NOW place the timing mark to 0, IT IS OK TO ROTATE THE ENGINE BACK OR FORWARD TO LINE UP THE TIMING MARK TO ZERO.
- Remove the screw driver and put the spark plug back in the engine and connect the #1 spark plug wire as well as all the cylinders wires.
- YOU MUST REMOVE THE VACUUM LINE CONNECTED TO THE DISTRIBUTOR ADVANCED AND PLUG OR PINCH THE LINE CLOSED.
- YOU MUST ALSO REMOVE THE FUEL CANISTER HOSE THAT LEADS TO YOUR GAS TANK AND CLAMP IT AS WELL. (NOT THE HOSE THAT LEADS TO YOUR CARB, THE OTHER HOSE).
- Get your timing light you purchased and hook it up to the positive and negative terminals on your battery, place the magnetic inductor clamp around your #1 spark plug wire near the spark plug but not resting on the exhaust of course, now you have to have someone start the car while you slowly rotate the distributor left and or right while shining the timing light on the timing indicator being careful you are not leaning in too far towards the engine and not wearing loose clothing or jewelry that can get caught up in the motor, you can tighten down the distributor bolt a little firm but lose enough to turn the distributor, MAKE SURE YOUR CAP AND BATTERY LEAD AND ALL YOUR SPARK PLUG WIRES ARE BACK ON, turn the distributor slowly left and right to get the engine to fire, when the engine has fired up then you have to use the timing light at the same time with one hand moving the distributor and the other using the timing light watching the timing mark and turning the distributor set it to 12 degrees before top dead center or in other words at the 12 mark. !!!!!BE CAREFUL NOT TO INJURE YOURSELF ON THE FAN BLADE AND MOVING PARTS!!!!!
- Once dialed into 12 degrees BTDC DON'T MOVE THE DISTRIBUTOR AT ALL! HOLD IT IN THAT POSITION, SHUT THE ENGINE OFF WHILE YOU MAINTAIN TO HOLD THE DISTRIBUTOR IN THE EXACT SPOT, make sure it stays in that exact position.
- With the engine off now bolt down the distributor making sure it has not moved at all from the dialed in position.
- Restart the car making sure it will start every time and check again with the timing light that you are still at 12 degrees BTDC.
- Redo process if the timing has changed, you are allowed a 3 degrees variance in either direction when getting your vehicle smogged.
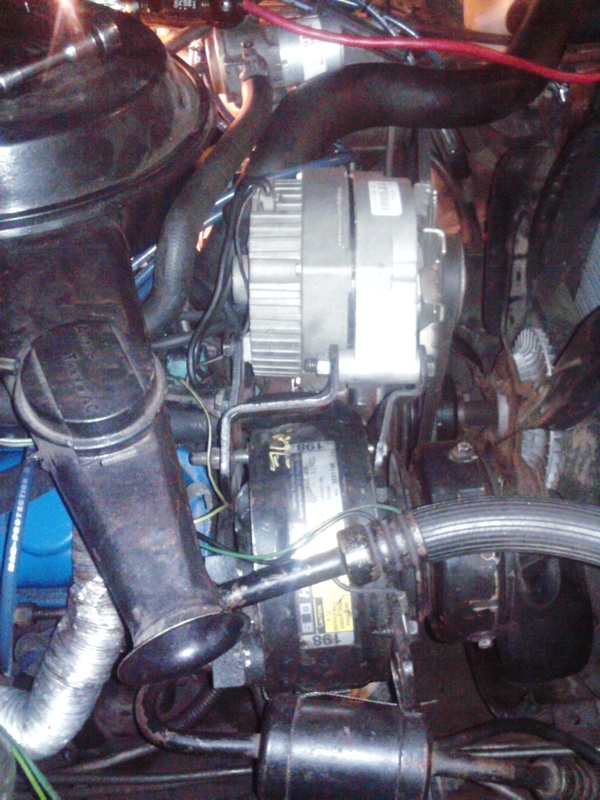
- YOU WILL HAVE TO GET A (SWIVEL HEAD) SOCKET WRENCH TO TIGHTEN DOWN OR LOOSEN THE DISTRIBUTOR BOLT.
- IT IS A PAIN BUT IT IS EASIER TO GET TO THE DISTRIBUTOR BOLD BY UNBOLTING THE ALTERNATOR FROM THE CURVED BRACKET AND LOOSENING THE OTHER BOLT TO SWIVLE THE ALTERNATOR OUT OF THE WAY TO EASILY GET TO THE DISTRIBUTOR BOLT BUT YOU HAVE TO PUT BACK THE ALTERNATOR AND BELT AND TIGHTEN DOWN EACH TIME AND MOVE IT AGAIN IF YOUR TIMING IS OFF BUT IT MAKES IT ALLOT EASIER TO GET TO THE DISTRIBUTOR BOLT.
!!! TRICK !!!
I GROUND OFF 1/3 OF THE DISTRIBUTOR WASHER THAT IS CONNECTED TO THE DISTRIBUTOR BOLT SO YOU CAN REMOVE THE DISTRIBUTOR WITHOUT HAVING TO REMOVE THE BOLT OVER AND OVER AGAIN. YOU CAN MOVE THE CUT OFF PART OR NOW MISSING SECTION OF THE WASHER OVER THE DISTRIBUTOR HOLE AREA SO YOU CAN REMOVE AND REPLACE THE DISTRIBUTOR MULTIPLE TIMES EASILY WHEN ADJUSTING YOU ROTOR WHEN THE DISTRIBUTOR IS SNAPPED ALL THE WAY DOWN, SIMPLY TRUN THE WASHER UNTIL THE WHOLE SIDE OF THE WASHER IS OVER THE DISTRIBUTOR HOUSING TO BOLT IT DOWN.
!!!!!BE VERY VERY VERY CAREFUL NOT TO HURT YOURSELF FROM THE FAN BLADE AND OTHER MOVING PARTS, SERIOUS INJURY CAN OCCUR IF NOT CAREFUL!!!!
!!!!!! Do not wear loose clothing or necklaces or bracelets or anything that can get caught in the fan blade ect. pull back long hair if you have long hair !!!!!

Firing Order for ODD FIRE and other engine types.
Top left diagram is for the 231 V6 odd fire
Oil Pump Gear and Housing

Distributor Placement

REMEMBER TO PLUG IN YOUR BATTERY LEAD TO THE BATTERY TERMINAL SIDE ON THE DISTRIBUTOR CAP, YOU WONT GET ANY FIRING IF IT IS UNPLUGGED.
Distributor Differences
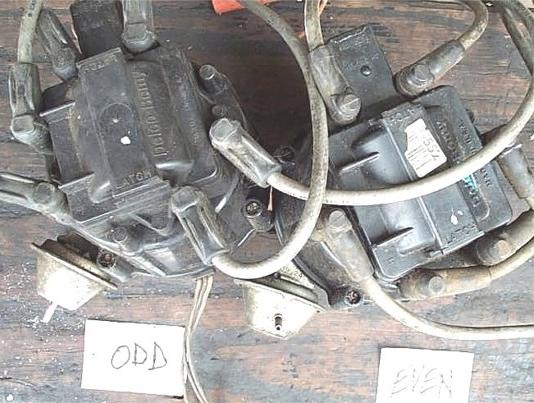
THE ODD FIRE DISTRIBUTOR CAP "LEFT" HAS TWO FAKE TOWERS ON THE CAP AND IS ODDLY SPACED, THERE ARE 4 AROUND THE TOP AND 2 TOWARDS THE BOTTOM.
THE EVEN FIRE DISTRIBUTOR CAP "RIGHT" TOWERS ARE EVENLY SPACED.
MID 1977 IS WHEN THEY CHANGED TO EVEN FIRE ENGINES. PRE MID 1977 ARE ODD FIRE ENGINES. THE BLOCK IS THE SAME BUT THE CRANKSHAFT, FLYWHEEL, CAMSHAFT AND DISTRIBUTOR ARE DIFFERENT.
THE EVEN FIRE DISTRIBUTOR CAP "RIGHT" TOWERS ARE EVENLY SPACED.
MID 1977 IS WHEN THEY CHANGED TO EVEN FIRE ENGINES. PRE MID 1977 ARE ODD FIRE ENGINES. THE BLOCK IS THE SAME BUT THE CRANKSHAFT, FLYWHEEL, CAMSHAFT AND DISTRIBUTOR ARE DIFFERENT.
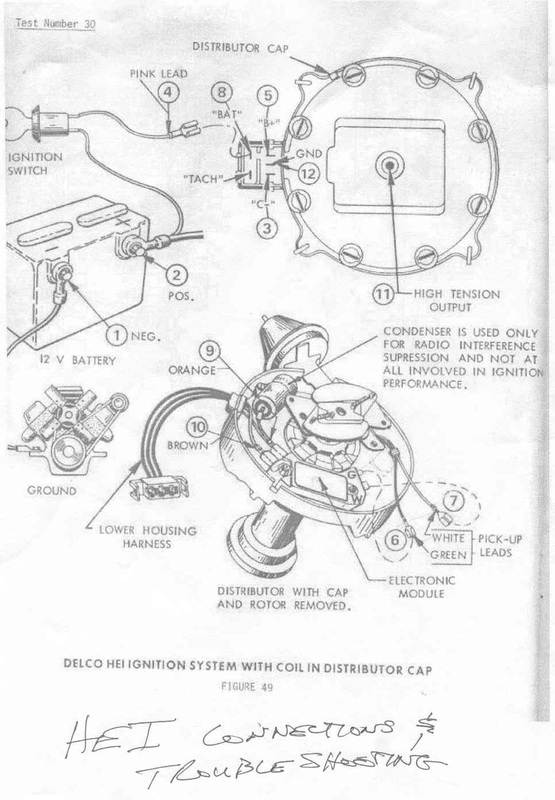
Inside an HEI Distributor Cap.
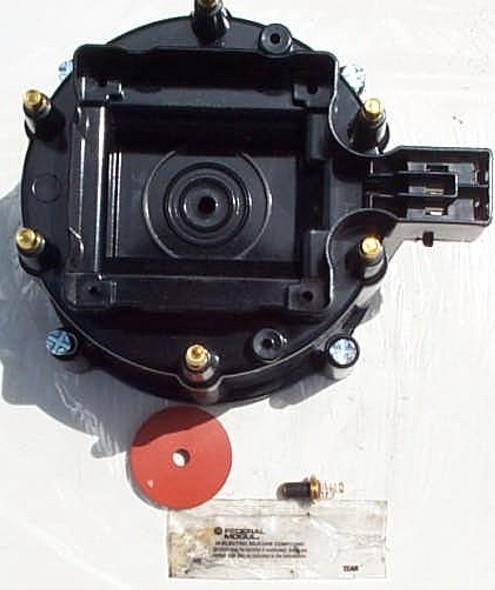
INSIDE AN HEI DISTRIBUTOR CAP, HEI DISTRIBUTORS SUPPLY MORE ELECTRICITY TO THE SPARK PLUG WIRES GIVING YOU A DEFINITE AND HOTTER SPARK TO YOUR SPARK PLUG AND THEY ARE STANDARD FOR THE 231 ODD FIRE.
HEI Distributor Diagram